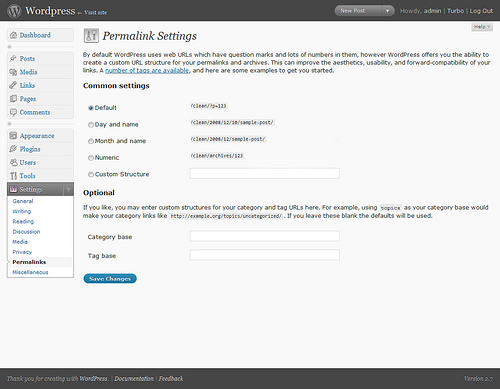
 Changing the structure of your permalinks is probably one of the easiest and most effective things you can do to improve the search engine optimization (SEO) of your travel blog right away. Permalinks are basically the URL or web address of a give blog page or post. Here’s an example:
Most WordPress blogs are configured with a default structure though that looks like this:
Do You See The Difference?
Based on the links themselves you can see from the first one what the post is about and not much from the second one. Aside from the obvious, permalinks and the keywords contained in them are also used by Google and other search engines to ‘read’ what your post is about. These days I typically see most travel bloggers have made this change but if you haven’t, here’s how to do it in WordPress.
- In your WordPress admin panel (http://yoursite/wp-admin) look on the left hand side, under “Settings” click “Permalinks”.
- From there you can select a structure that includes the post date and name, or a custom structure. For example, if you want your urls to include your category name and post title by default add “/%category%/%postname%/”. You can really begin to customize your links by checking out these WordPress tags. Some common ones you may be interested in are tags (%tags%) or author (%author%).
- Click “Save Changes”. If you get a warning that you’re .htaccess file is not writable by the server you’ll need to create one. (More information at the bottom of this article.)
 Custom Permalinks For Individual Posts
You can also work on your permalinks to improve them for SEO purposes on each individual post. For example you may have a post titled “My Trip To Mexico’s Beaches With Family” which would give you a permalink something like:
- http://yoursite.com/my-trip-to-mexicos-beaches-with-family
That’s better than the default WordPress ugly links but there are a few junk words in there. You can adjust the permalink when scheduling your travel blog posts in WordPress easily to optimize a bit for SEO.
- Right under your post titles in the Edit Post screen, there’s an “Edit” button next to the permalink WordPress has created automatically.
Using the permalink editing feature you could optimize your url to something like “mexico-beaches” or “family-mexican-beaches”. There’s a lot more that goes into SEO and if you really want to refine your site I recommend you read DIY SEO which is very specific.
Don’t Use Ugly URLs
There is no reason to use the default WordPress ugly permalinks. This post is specific to WordPress but you can edit urls using Google’s Blogger and the other blogging platforms as well. While you don’t have to customize your permalinks for each post, you’ll do yourself and travel blog a huge favor by not using ugly links. Pretty urls and permalinks translate into better search engine results (relative to ugly links) and can mean more traffic and exposure for your travel blog.
[photos by: hyper123 (WordPress dashboard), k.landerholm (chisel)]

nice, thanks a lot =)
You’re welcome..
This is sound advice that everyone should do once they set up their wordpress site. The only problem is when you choose one type of permalinks then you change your mind a few months later and the links will be broken. There is a redirect plugin but it’s too onerous to add the urls one by one.
When I first did this years ago I had to go through my database manually and change the links. Not fun let me tell you! I didn’t know about the redirect plugin, thanks for sharing – excellent point 🙂
That would have been a nightmare if you had too many posts!
The plugin is called Redirection, if anyone is interested. Here is the url:
http://urbangiraffe.com/plugins/redirection/
Great resource, thanks for the link!