≡ Menu
porto portugal windows

Although there are both sides to the debate on whether you should or shouldn’t force all external links to open in new windows, if you decide to, don’t use a plugin to complete the job. With a few simple lines of code you can have links pointing to sites outside of your travel blog open in new tabs or windows when users click on them. Doing so potentially keeps people on your blog longer while not using a plugin helps you avoid potential conflicts with others you may be running.

Open Your functions.php File

You can find and edit your functions.php file in one of two common ways. Either through the editor in the WordPress admin interface (Appearance > Editor) or through FTP (wp-content > Themes > [Your theme in use] > functions.php). Once the file is open, copy and paste it to another file or your desktop, so you have a copy in case something goes wrong.

texas state capital buildingTwo Important Things To Note

The first is that some themes, like versions of the popular Thesis, have custom function files. You’ll want to place the code there if that’s how your particular WordPress theme is setup. (They do this to make themes more flexible with updates.)

The second is to place the code right above this – ?> – at the bottom of your functions.php file. Not doing so will either break your theme completely or result in lines of code hanging in your header. (Placing the code after the ?> or at the very top of the functions.php file are the two most common mistakes I find people make.)

Insert This Code

Be sure to replace “YOURSITE” with your particular domain name.

function autoblank($text) {
$return = str_replace(‘href=’, ‘target=”_blank” href=’, $text);
$return = str_replace(‘target=”_blank” href=”http://YOURSITE.com’, ‘href=”http://YOURSITE.com’, $return);
$return = str_replace(‘target=”_blank” href=”#’, ‘href=”#’, $return);
$return = str_replace(‘ target = “_blank”>’, ‘>’, $return);
return $return;
}

To have all links left by your readers in the comments section open in new windows as well, simply add these two lines to the code above:

add_filter(‘the_content’, ‘autoblank’);
add_filter(‘comment_text’, ‘autoblank’);

Hopefully now you’ve got all of the links you want opening up in new tabs or windows (which one depends on the browser settings of the viewer). In case you do notice errors, check the first two points above, and if all else fails, simply delete the code from your functions.php file.

Other Methods And Useful Lines Of Code

There are a number of alternate ways to do the same thing although I prefer this method over using jQuery. Using PHP reduces the chances of you running into code conflicts and will likely keep your travel blog loading faster as well. A few lines of code can go a long way, like using a trailing slash for site speed and improving SEO or enabling SSL for password security.

{ 4 comments }
macbook pro keyboard

No security is absolute and there isn’t a single password perfect enough to protect you from every type of hack that exists now or will in the future.

Unfortunately there’s no mystical password out there in the ether to that can secure all of your online accounts forever. One great password isn’t nearly enough. You need a layered password strategy that requires a unique login for each of your online accounts. But that same technology that forces you to have multiple passwords – giving you a headache – can actually relive you of having to do any additional brainwork at all.

Security Is A Strategy, Not A Solution

We tend to focus on the endpoints of security like a metaphorical egg. Hard shell around the exterior but once it’s cracked, nothing stopping you from the yolk. Having multiple passwords is like adding shell after shell to your online world and identity, so if someone does hack an account, they’re limited in what they have access to.

What most hackers do when they gain access to any of your online accounts is not immediately try to empty out your bank account. They’ll use your email address to identify other accounts, hoping you’re using a single password for all of them. Slowly gathering information, they’ll then take what they can get, whether it’s personal messages, money, or your questionable spring break photos. When you’re only using a single password, you can never been sure what’s been stolen if one of your accounts is compromised.

So, rather than having to change all of your passwords, set up multiple passwords so you only have to change one when the day comes you get hacked. Luckily, technology is on our side to do most of the work for us.
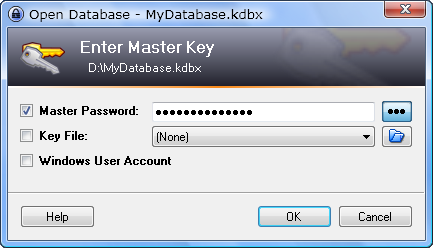
keepassxTools To Create And Track All Of Your Passwords

Don’t bother trying to conjure up complex passwords you’ll end up forgetting and resetting over and over. Your brain is the most complex computer in the known universe, use it for what its good at, which isn’t coming up with passwords.

  • KeePass (free) – My favorite password management tool, it lets you store all of your account usernames and passwords on your hard drive in an encrypted folder. You only need to remember the single KeePass password, then just copy and paste passwords as you log into Facebook, email, and your bank accounts. KeePass is also available on iOS, Android, Blackberry as a mobile app, which you can sync with your desk or laptop.

I have over 100 passwords stored on my KeePass, one for each account that’s randomly generated as complex as a given site will allow. Typically, my passwords are 16-22 characters long with numbers, symbols, upper and lower case characters.

And I don’t know any of them except two. One is to KeePass itself, and the other is to my email account. All of the other places I log in regularly: Twitter, Facebook, and my blog require me to copy and paste the password from KeePass into the site. That’s literally 4 mouse clicks for some peace of mind. Not only do I not have to remember much, it’s quick – and I can probably log into all of my accounts faster than you can type in even the crappiest 123password!

  • Lastpass is an another free password manager. Easy to use. The premium version, which you’ll need for your mobile devices, costs $12 per annum.
  • 1Password is a sophisticated user-friendly solution, but it comes at a price. There’s a 30-day free trial period, after that, depending on the licence you want (family, pro, single), prices start at $49.99.

Passwords Aren’t Absolute – Use The Next Step When You Can

There are a number of ways to hack an account that’s secured by password only. A hacker may try guessing the most common passwords, breaking the site, or fooling you into revealing some of your account information. (Like this attack last year against Tumblr.) It’s easy to steal what someone knows – which is why many sites take advantage of two-factor authentication – something you have combined with something you know.

Both Paypal and many HSBC banking accounts have the option of two-factor authentication; in the form of a small password-generating token they send to you for $5 or less. These small devices display a new number every 30-60 seconds which you need to enter with your password. Just having the password isn’t enough.

Many financial institutions offer hardware tokens but typically don’t advertise them for consumer accounts. Call you bank and other money-managing service providers to see if they’ve got tokens available for account logins. That way, if your password is compromised, the attacker won’t be able to get into your account. Unless of course you didn’t follow my advice above and are using the same password for each login.

Don’t Just Keep Tweaking The Same Password Ending

It’s important, which is why I mention it again, that you don’t come up with your own passwords. Even if you tweak the same password root for each account (e.g. Kermit123!, Kermit-5566, etc.) for a computer doing the guessing, it really doesn’t matter at all. The most used password roots are widely known and generally consist of real words, sequential numbers, and proper names.

Go random and use a unique password for each of your online accounts, otherwise you’re only fooling yourself into feeling secure.

Rules To Login By

As a reminder, these are the basic best practices you should follow.

  1. Use A Password Manager – KeePass or LastPass are my personal recommendations.
  2. Generate A Unique Password For Each Account – Both programs can create randomly generated passwords for you. Use this feature and don’t bother trying to remember any of them, except the password for the password program itself.
  3. Ask Your Banks For Tokens – If they don’t offer them, suggest that they do.
  4. Don’t Send Your Passwords Over Email – It’s like writing your personal secrets on a postcard. If you do have to send a password, use Skype (chat or voice). The connections are encrypted.
  5. Any Password You Came Up With In Your Head – …isn’t a good password. Magicians have known for a long time, we all tend to pick the same random numbers.

You Know What To Do So Do It Now!

A dedicated 15 minutes should be about what you need to download one of the password managers above, generate passwords for each of your accounts, and then go online and change each one. A quarter of an hour is a small amount of time to pay compared to the effort it takes to recover from a hacked email, bank, and Facebook account. Oh and Twitter. Because you used practically the same password for that too.

Finally, keep in mind that none of your online accounts aren’t worth using a unique and randomly generated password. That off-the-cuff password you selected for your unused Pinterest account can reveal a lot about you.The first step, for a hacker, is the hardest; after that it depends on you.

I originally published this post on the Travelllll, which will be closing its digital doors at the end of the month.

{ 1 comment }
romanian ads

A question I received from Dean in the comments of a previous post (oops, over a year ago – I’m late, don’t hate) was how to work with sponsors when they want to advertise their products or services through your travel blog. That’s a broad question but I’ll try my best to narrow down that gray area between blogger and advertiser when you’re not selling a direct ad.

“I’d welcome your suggestions about working with advertisers when it comes to running competitions and promotions of their products/services, eg, what’s in it for me, what to ask for etc. Thanks.” -Dean

petronas towers shoppingProducts, Products Everywhere

Blog long enough and you’re certain to get companies of all sorts asking you to take a look at or blatantly promote their products and services. Most of these offers come as promotional scatter-shot. There has to be a trade off whenever you work with some other entity or person on your travel blog. That could be monetary compensation or content but whatever it is as a blogger, you need to look at it from your side.

Too many (especially newer) bloggers worry too much about what the other side is getting in a deal, acting so scared to lose any potential offer they promote everything for nothing. Trust me, the other side is already concentrating on what they want to get out of a deal; you can’t meet anybody halfway if you’re running after them.

Know What Fits Your Site

Don’t even consider a product or service from an advertiser if you don’t think it’s useful or would be interesting to your readers. Companies approach you to promote their products for as little money as they can; don’t jump at every or many of the offers you get unless there is some clear benefit to your business. What you promote is a message about your blog and your online image, be discriminating.

Spread Out Effecticely

Many promoters want you to dedicate an entire blog post to their product or service. And, on rare occasions, something interesting enough comes along to warrant just that. (For example, when I did a Monster Inspiration headphones review.) On other occasions a product or service you’re given an offer to try may just be a good fit as part of a large blog post on a related topic.

Or as a free giveaway on Facebook or through your newsletter, something like I did with Swarovski Optik last month. Leverage the offers you receive and make them work for your blog naturally, so they don’t feel like a detour or distraction, but rather a natural expansion of your travel blog.

{ 0 comments }

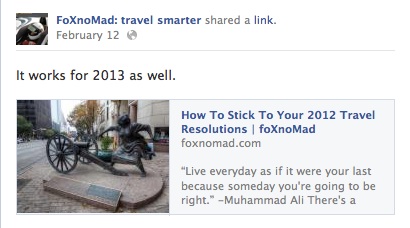
facebook thumbnail linksOne of the most frustrating things about posting a travel blog or other link to your Facebook fan page is when that social network can’t seem to place a thumbnail with your url. Without the tiny picture, your link looks like an ugly excerpt of floating text in the timelines of all your followers – not very attractive to click on. Fortunately, there are two rather straightforward methods of getting Facebook to work a little harder and generate a thumbnail for the links you post.

Refresh Facebook’s Cache Using Their Debugger

The little advertised Facebook URL Debugger for developers is the easiest way to get a thumbnail for any link you post to Facebook. All you need to do is enter in the url you’re having trouble with and click ‘debug’. What this does is refresh the cache Facebook has taken of that particular post or page, which is usually enough to generate a thumbnail when you go to post the link again. On pages with a large number of pictures or thumbnails however (as I have on the side of foXnoMad’s latest posts) Facebook may get confused and pick up the wrong picture. In those cases, repeat the process a few times and that generally does the trick.

facebook debug tool

What To Do In Case Of Constant Problems

If the no-thumbnail problem is more than an occasional nuisance for your site, one of the most straightforward fixes is to implement the Facebook “Like” button on all of your travel blog posts and pages. That helps Facebook take over the Internet crawl your blog and the images on every page much better. Images placed at the top of posts and pages also tend to be picked up first by the Facebook thumbnail generator so don’t neglect pictures “above the fold.”

Finally, it’s important to properly code and label images when you post them and don’t forget to share your blog posts without ugly links on Facebook.

{ 0 comments }

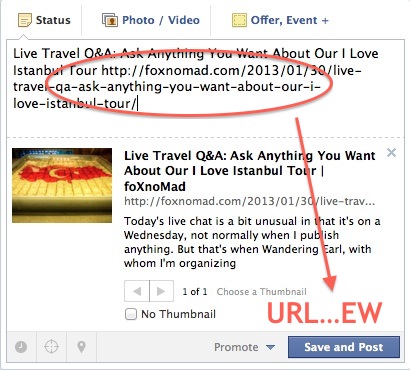
One way to share links from your travel blog is to click the “like” button on one of your recent posts – but that only shares the content on your personal Facebook profile. Albeit with a clean link and thumbnail, as well, as any comments or post title you want to add above it. One problem that many bloggers seem to encounter when they want to post an article to their Facebook fan page is they don’t know how to do so without leaving the ugly URL in the status update box. The fix is really quite simple and will make your travel blog posts on Facebook look so much prettier and enticing to click.

facebook ugly links

First Step: Do What You’ve Been Doing

When you have a post you want to share on your Facebook fan page, you’ll initially follow the same steps you likely have been already. Simply write the text you want to convey or the title of your travel blog post, i.e. “Should I Buy A Tablet Instead Of A Laptop For My Travels?”, then paste the link to the story right after it. (Continuing the same example: http://foxnomad.com/2012/11/20/should-i-buy-a-tablet-instead-of-a-laptop-for-my-travels/)

  • In the status box you’d have this: Should I Buy A Tablet Instead Of A Laptop For My Travels? http://foxnomad.com/2012/11/20/should-i-buy-a-tablet-instead-of-a-laptop-for-my-travels/

Keep in mind I’m just using the title as an example, it really doesn’t matter what text you place before the link.

Wait Until The Link Preview And Thumbnail Show Up

Once you’ve placed your text and link in the status box – you know the drill – wait a few seconds for Facebook to automatically generate a pretty link with preview text and thumbnail. (Next week I’ll be covering how to get a thumbnail on your posted links for those pesky times Facebook refuses to do it.) Once the link is set and appears how you like it, simply highlight and delete the URL you pasted in the status bar. Now you’re left with only the text or title you entered and the pretty link.

facebook clean link

This should help keep your travel blog’s Facebook fan page looking clean and potentially increase your click-through rates.

{ 4 comments }

cloudflareOne of the simplest ways you can speed up and secure your travel blog with a few clicks is by using Cloudflare. That service, which I use on foXnoMad and my other blogs, acts primarily as an invisible security barrier to your blog to protect it from spam and hacking. In addition, Cloudflare is a content delivery network (CDN); which distributes parts of your blog to other servers, speeding things up overall. (Here’s my earlier primer on CDNs.)

Cloudflare also comes with several other helpful features, like minifying, that may be enabled by default. (Specifically if you’ve chosen to use their “Advanced Performance Options.”) Minifying, in terms of computer code, is essentially a process where the code is streamlined by removing irrelevant portions of it. There are a number of ways to minify code, including WordPress plugins and Cloudflare – though you don’t want to use both at the same time.

It May Be Obvious Or Not – Why You Shouldn’t Use Both

Implementing any form of minifying doesn’t often go completely smooth at first. Chances are there’s a lot of Java, plugins, and custom theme images floating around your travel blog. When you minify for the first time you may notice parts of your pages not displaying properly or certain plugins acting up. That can happen when you’re only using one minifying solution; when you use two, the problems aren’t always as blatant.

glass turtle

When Cloudflare has minifying enabled upon activation, you might not notice it conflicting with your other minifying plugin right away. Some typical symptoms can be site-sluggishness, images loading incompletely, or certain pages on your site showing up blank.

How To Choose The Minify To Use

Optimizing a site is like picking out a nice outfit – there are some general guidelines you can follow but in the end its an individual formula. Generally speaking, if you’re already using a minification service and it’s working well, use these services to test your page-load times. Then, disable that minifier and switch to Cloudflare’s, running the same tests. If there’s a marked improvement in loading times or responsiveness of your site you know which to stick with.

In my personal experience, after developing a number of sites, I’ve found that Cloudflare’s auto-minify feature works with fewer problems upon activation. Those of you not minifying the code on your travel blog and looking for a good option, I’d recommend you starting out with Cloudflare.

A Quick Check To Be Sure

If your travel blog happens to be running Cloudflare (which has a free version of their service by the way) be sure to log into your account, go to Performance Settings, and check your ‘Auto-Minify’ settings. If they’re enabled, be sure you’re not using another minify plugin at the same time. Also, sites running W3 Total Cache (my preferred caching plugin) should check under ‘General Settings’ that minfying isn’t enabled there either.

Provided you’re not using more than one minify service at the same time, it’s an effective and recommended way to reduce your blog’s loading time.

{ 15 comments }
green and orange jfold wallet

A question I often find in my inbox and see on travel blogging forums is, “how can I make money with my blog?” If a blog were a direct method of making money, everyone would have a blog. A blog is simply a medium; asking how to make money with it is like purchasing a new laptop and then asking the clerk at checkout how to develop your career around it.

A blogger needs to ask themselves, if they want to monetize their site, the right questions from the bottom up, not the reverse. Why should anyone give you money? This is the simplest question any business that stays in business regularly asks itself. If you’re not asking yourself why should anyone give you money you will fail at doing so. The reality is, even if you are asking that question, you may fail. But in the latter situation, the outcome is much more in your hands.

crowd of peopleHow Most People Go About Making Money From Travel Blogs

Whenever you earn a cent from your blog, the person or company sending you that money is paying you in exchange for something. Companies purchase text links to improve their search engine rankings, buy banner ads to promote their products to your audience, and donation buttons work because ultimately someone wants to help cover your costs (or travels) somehow. You are essentially monetizing an audience who happens to congregate on your travel blog (and by extension you and all of the places you hangout. Like Facebook.)

Keeping Your Content In Context

The quality of your content does not correlate to the amount of money a blog or other media format makes. (Which explains the success of reality television.) Generally the thinking behind ‘content is king’ is that good writing, photography, etc. will lead to a bigger audience. There is no guarantee that it will however (but producing an enticing formula for crap isn’t that easy either.)

Having an audience is only one broad layer of your monetizing strategy – you need to keep it in perspective to relevant websites on the Internet. How many people actually follow you? Why do they visit your site? What’s their demographic? How big is your audience to anyone who would pay money for it? Why would anyone want to give you money to communicate with the people following your blog?

Entertainment Vs. Problem Solving

So as you wander down the rabbit hole instead of staring at what comes out of it and happens to fall in your lap, you can take your monetizing logic one further step back. Why would an audience follow you in the first place? Most travel blogs and forms of media fall somewhere in between two pots – entertainment and problem solving. They can, of course, overlap (most of the best sites do) but people are exchanging their time with you for some gain. Maybe they like to laugh, get taken away on wild travel adventures, or learn the best ways to find cheap flights. How your audience grows will dictate how successful you are at being entertaining or useful and that audience may lead you indirectly to some income.

You may yet fail or succeed but you’ll be asking the right questions. Making money online is capitalism – the market dictates which bloggers make money and how – not communism where everyone makes something just for showing up. There are infinite roads from A to B; some lead to money, others are just you working for free. Now you’re thinking in the right direction. The rest is up to you.

{ 6 comments }

This is a guest post by Jason Demant, the co-founder of Unanchor whom I interviewed back in 2010. Since then, a few things have changed on the site where travelers can create and sell their own personalized itineraries – this is Part 2 on how to write great travel itineraries in a series that covers 3 of my sites. You can catch Part 1: Earn Some Extra Travel Cash By Writing City Guides On Unanchor and see Unanchor in action with Part 3: What To Do In Seoul, South Korea On A 24 Hour Layover.

alexandria egypt

As the cofounder of Unanchor.com, I have read over 100 travel itineraries. Through this process I’ve learned a lot about what it takes to write a great itinerary. In today’s post I’d like to offer my advice and tips for any aspiring travel writers on how to write the perfect travel itinerary.

Why Write Itineraries?

The first question you may be wondering is why write a travel itinerary to begin with?

  • Show off your local expertise.
  • Give people a new way to travel and see your favorite city.
  • It’s a great way to complement your travel blog by showing your readers exactly how you traveled a particular city or how you recommend they see your city.

…and of course you can make some extra money by selling them on Unanchor.

big ben london englandHave The Right Mentality – Be Their Tour Guide

The best way to begin the itinerary writing process is to ask yourself what you would do with your close friend if they were visiting your city for the first time.

  • What attractions would you take them to see?
  • What information would you tell them about your city?
  • What restaurants would you go to?
  • Where are the great local gems that you only know about from living in the city?
  • Where do the locals hang out and what do they do?

Give travelers what they want, not what they ask for.

I believe that travelers ask for options but they really want advice and recommendations. When writing an itinerary limit the number of options you give travelers. Don’t forget, you’re the expert. Don’t be bashful, travelers want your recommendations. There’s no harm in giving your recommendations – people can always choose to do their own thing.

Provide Clear Directions

Some people are great at reading maps while others aren’t, so make sure to include both a map and written directions. The best directions are those that constantly give clues that you’re on the right track. This is as easy as identifying landmarks that you’ll pass as you go. Make sure to mention things that they may see if they’ve gone too far as well.

  • Restaurants – These are the exception where giving options is a good idea. However, when recommending multiple restaurants, make sure it’s easy to understand the differences between them. Avoid recommending restaurants that serve the same food in the same price range. Otherwise, how will the traveler be able to understand the differences?

Don’t forget to recommend the best dishes at the restaurants as well. Restaurants are typically known for a dish or two and be sure to mention those.

Don’t Forget The Photos

taksim islak hamburger

Including pictures is a great way to spice up your travel itinerary. But which pictures do you include? The best pictures are used to show the travelers what they’re looking for or that they’re on the right track in the directions. Some good examples:

  • A famous building.
  • The front of the restaurant that you recommend.
  • A tricky, easy to miss turn.

The Format

The itinerary should have a clear and easy-to-read format. You want to lead the traveler through your city, from activity-to-activity as if you’re walking there next to them. If you’re looking for a pre-made template, you can download Unanchor’s itinerary template here [MS Word document]. (If you choose to write for Unanchor, we have an online itinerary generator that takes care of the formatting for you.)

Some Other General Tips

Unless you clearly explain it, try to avoid acronyms, local lingo and nicknames as much as possible. Don’t forget to recommend how to get to the first destination of the day. You won’t know exactly where the traveler is staying, so you’ll want to mention any public transportation stops that are nearby or if it’s easier to just take a taxi.

Thank you Jason for this itinerary power lesson. Students (aka. all of you) can visit UnAnchor, to earn some extra cash by helping out other travelers with your experienced tips. Follow up with Part 1: Earn Some Extra Travel Cash By Writing City Guides On UnAnchor and get a good example in Part 3: What To Do In Seoul, South Korea On A 24 Hour Layover.

{ 4 comments }

boracay beachSeveral weeks ago I announced on foXnoMad that I would be taking two weeks off from blogging, including related activities like participating in social media, and responding to most emails. More than that this two week break would be part of a larger plan I had in mind – to allow myself 6 weeks of annual leave from my sites. I figured why not give myself what I had years ago when I was working for a boss that wasn’t me before I was in the position where I had to take a break.

I’ll be writing about the personal and travel side to the break in the coming weeks on foXnoMad but many, many of you wrote me wondering what would happen to a travel blog if it went quite for two weeks. I suspect many of you might be considering taking a few breaks yourself, so I’d like to share what I’ve learned and tell you what happened.

black netbookReducing Your Anxiety Through Preparation

You’ve probably had times where your blogging schedule was unexpectedly disrupted. As comforting as a regular posting schedule can be, when something like a site error or that thing called “life” gets in the way, it can have the opposite effect. Stress, worry, and headaches can come with the idea that you’re not tending to your travel blog every moment of the day. What happens in reality, however, is…not much. You’ll find that missing a blog post or leaving Twitter for a day or two doesn’t cause your travel blog to disappear into obscurity. What I’ve found is the length of the break doesn’t cause anxiety, it’s how predictable that break is.

I planned my blogging break in advance and announced about 10 days prior that I’d be taking 6 weeks of annual leave spread over the course of each year. The day before I took off, I let my readers know. This way they knew what to expect and wouldn’t be surprised by me going quiet on my site (although I did still reply to comments albeit slower than normal) and my silence on Twitter or Facebook.

The number of emails I received from my readers telling me that they’d miss me but be patiently awaiting my return was truly touching. People who had never written me before were reaching out and their support encouraged me further.

Looking At The Numbers

I honestly don’t track many blog statistics very closely; the ones I do focus on are my daily email, RSS subscribers, newsletter subscribers, Twitter followers, and Facebook fans. Those are people who’ve made a commitment to follow my travels and site in some way. They’re regulars; those numbers and the traffic from them didn’t decrease over the two weeks. In fact, my email and newsletter subscription rates increased slightly above average over the course of my break.

owl eyes

A few interesting things did happen to my pageviews. During the first 4 days of my break, they actually increased. I suspect this has something to do with the delayed effect of RSS, email, and other subscriptions. That is, most subscribers don’t check out your site immediately after you post something but rather when they’ve got some free time. Usually that ends up being 24-96 hours after your content pops up somewhere. A few people might have also been coming around to see where I had gone in case they missed the announcements too.

I didn’t have the usual spikes from posting new content, which was to be expected since there wasn’t any new content. My traffic from search engines wasn’t effected and created a solid backbone of traffic throughout the 2 weeks. Toward the end of my break my pageviews did decline slightly; however the average pageviews remained fairly the same over two weeks. The increase in the first 4 days helped to balance things out.

Finally, it’s worth noting that my server decided to have several fits (I swear it acts up for my attention) making my site unavailable much more than usual while I was away. Next time, now that those issues have been resolved, I’ll be interested to see how the trends change if they do. Don’t worry, I’ll be sure to share my findings with you.

Timing The Break And Lessons Learned

I decided to take my first two (of the 6 total) week break in February. It was a time in between any big blog events I had planned and I would be returning with my annual Best City to Visit Travel Tournament – typically a very busy time on foXnoMad. In the future I’ll probably plan my vacations at similar times. One thing I wasn’t prepared for was the number of emails waiting for me when I returned. Although I had been answering some emails along the way (yes, I did have a vacation responder set up), many of those “quick” messages I thought I could tackle in a few hours took 2 days. (I was primarily responding to emails related to the server I manage and advertising inquiries. Next time, I’ll probably have an assistant take care of those tasks.) Little things added up so next time I’ll come “back to the online office” with two non-writing days as a cushion.

To those of you who might be anxious about taking a blogging break, I hope I have been able to alleviate some of those concerns. The sky didn’t collapse in on itself and my readers were waiting for me when I got back. They were full of understanding and perhaps a bit more keen to see some new posts of mine.

Feel free to let me know if you have any specific questions about taking a blogging break in the comments below.

{ 16 comments }

cdn serverAn increasingly popular way to make travel blogs more efficient is through the use of content delivery networks (CDNs). They are an inexpensive and efficient way to improve loading time on several fronts but can be confusing to set up initially. There are two primary types of CDN – “pull” CDNs and “push” CDNs – which have different benefits and costs so today we’ll take a look at the which one might be best for you.
What Is A CDN?

A CDN helps to speed up static components of your blog (especially pictures of say, your bed in Rome) by distributing them across a number of servers around the world. This does two things – one is to put much of your travel blog’s content closer to the person who wants to view it. So, a person in Japan will download your beautiful photos of Granada from Tokyo, rather than your server sitting in Boston, for example. Less distance traveled means a faster download and secondly, if the content isn’t being pulled directly from your server, it saves overall computing power (important to have plenty of for when traffic gets really busy).

You can set up a CDN on your own server (in effect creating two download points for your photos) but most people opt for paid services like Amazon’s Cloudfront. (Next time I’ll talk about Cloudflare, which is a free alternative, although not a CDN by design.) With paid CDNs, you are generally charged by the amount of data in gigabytes that are downloaded from your site each month. (Here’s Amazon’s pricing chart to give you and idea.) Most travel blogs that aren’t very video intensive don’t have the kind of traffic or the content (e.g. podcasts) to make CDN usage very expensive.

Many hosting providers like Media Temple are also now including CDNs as extra features to their hosting packages though they tend to be much more expensive that 3rd-party alternatives.

push signWhat Is A Pull CDN Versus A Push CDN?

A very watered down explanation of the two is with a pull CDN, the CDN caches parts of your site upon request to their servers. A push CDN is where you upload your entire travel blog to the CDN so it’s ready for users at any given time. Let’s look a bit further.

  • Pull CDN: Imagine a person loading your latest travel blog post. It probably has pictures in it, as does your site’s theme (e.g. icons, background images, etc.) For this example let’s have your hosting server be in Boston. You’ve just published your latest travel blog post and your biggest fan in Japan wants to read it. With a pull CDN, the very first time she does, the content isn’t on the CDN. During this first request, the CDN “pulls” the images and so forth to CDN server nearest your Japanese fan. That could be Tokyo or Hong Kong, whichever it is, the very first time the CDN has to pull the post, meaning your server and reader won’t see any gain in speed. The second time however (and usually for 1-30 days later) the CDN has the content loaded and it’s will be available to everyone who is closest to that Tokyo or Hong Kong CDN server.
  • Push CDN: Going along with the example above, instead of waiting around for the CDN to pull the content when it’s needed, you simply upload the entire content of your travel blog to the CDN beforehand. That way your pictures, theme files, videos, and the rest are always on the CDN servers around the world.

Keep in mind that this isn’t the entire story or process of how CDNs work, it’s a look at the system from very high up in the sky. That said, it may seem like a push CDN is superior to a pull, but that’s not always the case.

small globeThe Benefits Of Pulling Or Pushing Your CDN

In general, a pull CDN is much easier to configure than a push CDN. Once initially configured, a pull CDN rather seamlessly stores and updates content on its servers as its requested. The data usually stays there for 24 hours or longer if the CDN doesn’t detect that a file has been modified. For low traffic sites or those that are sufficiently optimized with caching, good code, and more, a pull CDN provides speed without asking much of your server. Once your content is pulled (give it 48 hours to get enough data to make it a noticeable difference) the maintenance required is low.

  • So what makes a pull CDN so easy can also be a pain, especially when you’re making changes to your travel blog. Typically you don’t have control over how long the pull CDN cache lasts, so if you update a photo or theme, it might take up to 24 hours for all of your readers (and you) to see it. You lose control for ease so when it comes to making widespread changes like updating your theme, you often have to shut off the CDN during the process.

Conversely, a push CDN can put added strain on your server if it’s underpowered for your traffic, or you have lots of changing content in a given day. The reason being, pushing all of your data and any changes as they happen to the CDN takes work on your server’s part. If your server is already struggling under heavy load (here are a few tips to optimize your site) or has new content several times a day, all of them syncing between your server and the CDN might do more harm than good.

Which One Is Best For You?

The decision on which CDN type to go with revolves in large part around traffic and downloads. Travel blogs that are hosting videos and podcasts (aka. large downloads) will find a push CDN cheaper and more efficient in the long run since the CDN won’t re-download content until you actively push it to the CDN. A pull CDN can help high-traffic-small-download sites by keeping the most popular content on CDN servers. Subsequent updates (or “pulls”) for content aren’t frequent enough to drive up costs past that of a push CDN.

Whichever CDN type you end up choosing, I would strongly recommend you keeping track of your usage over the first 1-3 months as well as loading times. You may find that your specific travel blog is better configured for a push or a pull with a little experimentation. Experimentation that should take place on the weekend or other dead times because either way you go, DNS changes are going to make the first 48 hours messy.

[server photo by orangebrompton, push button by Steve Snodgrass, globe photo by fsse8info]

{ 1 comment }